Who is this for? More narrowly, people who are running Bayesian models and are looking for a speed boost. More broadly, anyone who needs more resources than their local machine can offer. Either way, remote options can be a great way to access more power and computing resources.
Background
I’ve recently come off a book project that involved running lots of multilevel Bayesian logit models (and some other stuff). At times this could be a pretty time-consuming process—with three outcome variables, each with four categories, and multiple model specifications, the modeling literally took days to complete.
As you might imagine, this experience prompted me to look for ways to speed up run times for my models. Now there are a number of ways to do this. Since we’re talking about Bayesian models, including informative or regularizing priors can be one way to speed things up. The models in the book were based on an earlier paper and the former had pretty bad vague priors. Bad in the sense that they were far too vague given the models we were running.
A very short and amateurish note on terminology used herein. I think these are mostly correct, but comments and suggestions are welcome in the space below.
- Local refers to your personal computer, whether that be a laptop, office desktop, etc. It’s what you’re typically working with.
- Remote refers to any “other” machine that you want to access and use from your local machine. For example, a university computing cluster.
- CPU refers to the computer’s central processing unit. This is the processor that does most of the computer’s calculations, runs programs, etc.
- GPU refers to the computer’s graphical processing unit. GPUs typically handle the computing associated with processing visual or graphical information. You might have a strong GPU if you’re really into gaming or doing more graphically intensive design work, animation, etc.
- Client refers to software that helps users access files or information from other sources. For example, web browsers are clients that help users find information on the internet, which is stored in a range of different sources.
- GUI refers to a graphical user interface. Here there is a visual element to how users interact with the computer. Think of navigating around on Windows or Mac and using your mouse to click on different icons, move files between little pictures of folders, etc.
- CLI refers to a command line interface. This requires users to enter specific textual commands into a command line prompt with no graphical element. If you’re old enough to remember installing computer games by exiting out of windows and moving from the C: drive to the D: drive to run Doom 2, that’s a version of this.
- FTP refers to file transfer protocol. Basically this is just a method of transferring files back and forth between a server and a client.
- SSH refers to secure shell protocol. Basically just a method of securely transferring information securely on an unsecured network.
- VPN refers to a virtual private network. This is a way to provide a secure connection between two or more users/devices over an unsecured network to help prevent people from monitoring content/traffic.
There are a number of other ways you get speed gains, too. Vectorizing your models is a big one. Since I was primarily using {brms} this involves a little bit of extra programming, and that’s a skill that I have to work on developing more moving forward.
These initial solutions focus mostly on better modeling practices, but there are other ways of achieving speed gains that start to (at least to my mind) require users to delve more into computer science. Stan and {brms} allow users to run their models in parallel, meaning that if users specify multiple chains those chains can be running at the same time (i.e. in parallel). At the most basic level this is pretty easy to implement when setting up a model with {brms}. The user just sets the argument for cores = to the desired number of computer processing cores they want to use.
More recently Stan has implemented a new feature called threading that allows for within-chain parallelization, which allows for even faster model run times. You can also (in some cases) draw on your computer’s GPU to speed things up by using {brms}’ opencl argument, but this only works with some Stan functions.
Power Up!

There’s also a more basic option that’s easy to overlook—get a faster computer! This isn’t to discount the importance or benefits of learning to program better/more efficiently. This is something that’s certainly on my agenda. But there are also often constraints that we face when working on different projects, and we can’t do everything at once. Depending on a project’s timelines you may need to focus on completing the analysis, and learning new skills always takes some time. Also, as mentioned above, some of the methods of obtaining speed gains aren’t always available for a given problem. And even if they are, there’s often no guarantee that your available computing power will be sufficient to produce noticeable gains. For example, threading might not be that useful if you don’t have many processing cores on your computer.
This was the position I found myself in. I ran most of the book’s models on a Dell desktop and a Macbook Pro with an M1 processor. The dilemma I faced was this: The desktop had sufficient memory to take on larger and more complex jobs, but had a fairly slow processor. The M1 on the other hand was much faster, but lacked the memory to take on more complex jobs or post-estimation work.
Finding a more powerful computer might be easier said than done. Getting a computer that’s fast enough to run multiple models in parallel can be…expensive, to say the least. But there are other ways to access more powerful machines and borrow processing power for more limited periods when you need it. So while buying a new machine is nice, it’s not strictly necessary.
Below I’ll detail four options that users can explore. Full disclosure—I’m not a computer science person, and my experience with these options is largely as an amateur user who needs them as a convenience in the pursuit of other tasks. Hopefully this serves as a useful starting point, but absolutely talk to someone with more domain knowledge if you want to learn more about specific options.
Use a Cluster
If you work at a larger university (or maybe even a smaller one) the chances are pretty good that the computer science/engineering department folks have a high performance computing cluster. The nice thing about these is that they are often available for use by anyone on campus.
The basic idea here is that you submit specific jobs that you want the cluster to process. These might be tasks that require significant processing speed or maybe more memory than your local machine can provide.
As an example, Kansas State University’s “Beocat” computing cluster is open to K-State faculty. You are first required to create an account. Once that’s done you have a personal profile that you can access and from which you can submit jobs for the cluster. Usually there’s some sort of manager that sorts jobs on the basis of estimated computing needs, duration, etc., so you might have to wait a little while for your models to start, finish, etc. You can also use a desktop client like Cyberduck that provides a GUI through which you can manage files and move them back and forth between your local machine and the cluster.
I’ll note that I had mixed success with this. R already runs on Beocat, but getting Stan and {brms} properly configured was a chore, and it never quite got here. I reached out for help a couple of times and the Beocat people (while very responsive) were never able to resolve things, so I had to find an alternative.
Amazon Web Services
Amazon Web Services is another option. Someone recommended this to me, and I started to look into it but never actually used it. My impression is that is functions much like accessing a university-based cluster. Amazon has a bunch of powerful computers that you can submit jobs to. Unlike your university’s cluster, though, there may be some small fee attached to it. I’m always a bit wary of this sort of arrangement as I don’t trust my up-front estimates of time and resource needs to be accurate, but maybe others with more experience will have more to say.
R Studio Server
The first two options rely on accessing fairly substantial computing resources set up by third (second?) parties. But what if your jobs don’t require that much power or time? Can you find more local solutions? Yes.
Let’s imagine that we have a slower laptop computer and a faster desktop computer located in our office. In this situation we might want to connect the laptop that we’re operating at home or at a coffee shop to the more powerful desktop so we can make the desktop do the more labor-intensive task of running our models.
This is the exact situation I now find myself in. I was fortunate enough to apply for a small internal grant for a new desktop and purchased a Mac Studio with the funds. It currently sits in my office on campus. I also often use my Macbook Pro, which as I mentioned previously doesn’t have a ton of memory. It’s fine for writing the models and code, but I don’t want to start a model that is going to suck up all of my memory and processing power, leaving me unable to complete other basic tasks.
There are a couple of ways that you can go about this. This first option was very graciously provided by Matti Vuorre in response to a question I posed on Mastodon. It requires that you download and install Tailscale, Docker, and possibly RStudio Server.
I’ll let people who are interested go ahead and check out Matti’s blog post on the subject because it’s more detailed than I can get into here. Suffice it to say his directions are very clear and I was able to get this approach up and running fairy easily.
Only a couple of major notes that I came across. First, make sure your remote (e.g. desktop) computer can’t go to sleep as this will break the connection and you won’t be able to establish/re-establish the connection from your remote location.
Second, you’ll also need something like Git/GitHub set up to help you move projects and files to the remote session.
Mac Screen Share
After playing with Matti’s recommendation for a while I came across another even more direct solution—Mac OS’ native Screen Sharing app. The only major limitation here that I’m currently aware of is that it requires both the local and remote computers to be Macs.
First, download Tailscale (linked above) on the local and remote devices. This will establish a VPN that you can use to connect the two computers securely. The nice thing about Tailscale is that it’s super easy to use. Specifically, it can create a menu bar icon where you can easily access the IP addresses of the relevant machines connected to the network. There’s also a web-based dashboard that you can use to monitor the devices on the network.
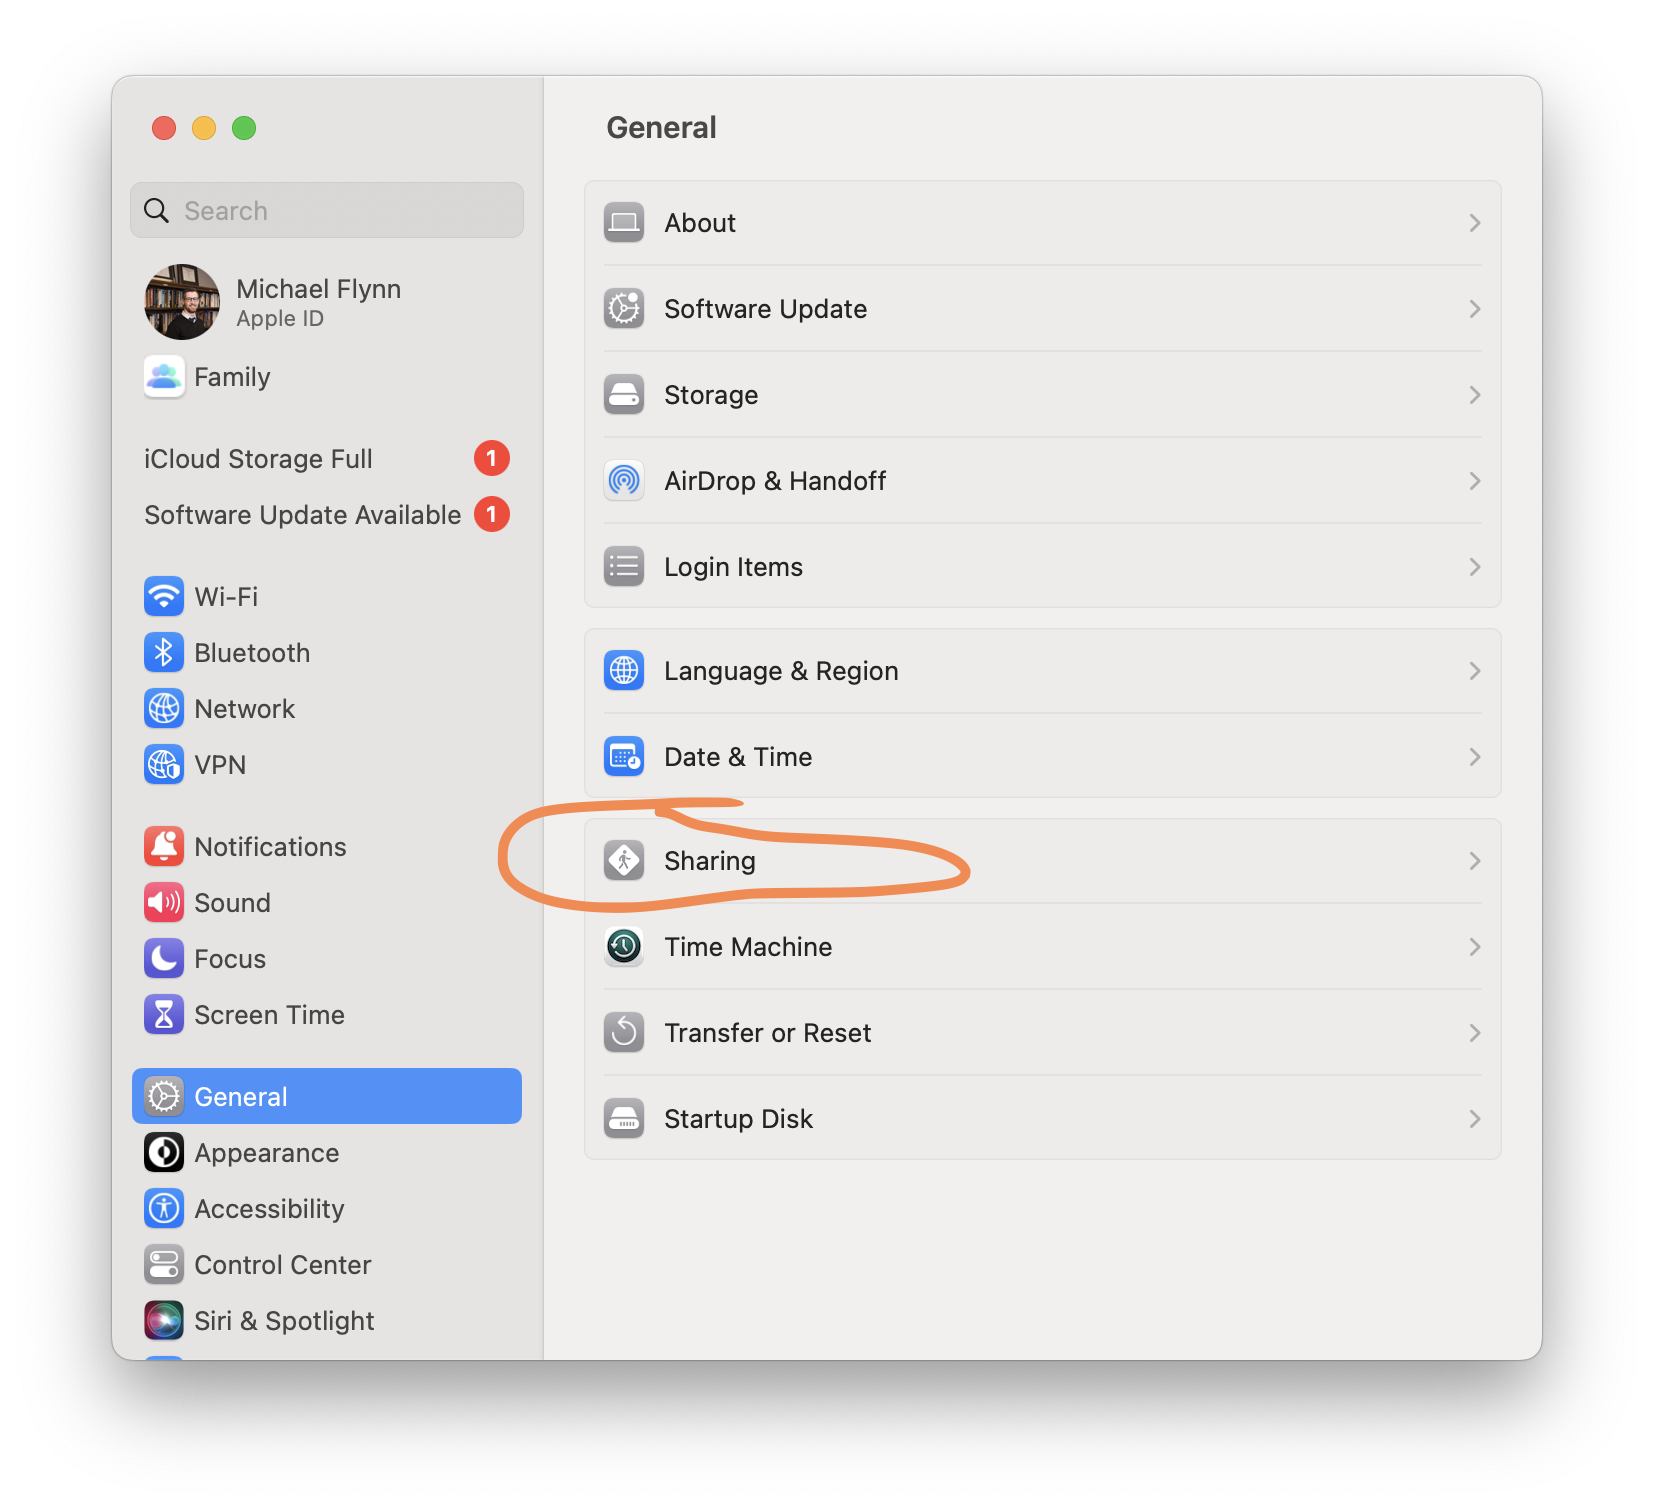
Second, this also requires you to edit some of the security and connection settings on your remote machine. To do this you first open up the System Settings menu, either through the icon on your task bar at the bottom of your screen or by clicking on the Apple icon in the upper left. Then you click on the General menu, and then on sharing over on the right hand side. Figure 1 shows the locations of these buttons in Mac OS Ventura.
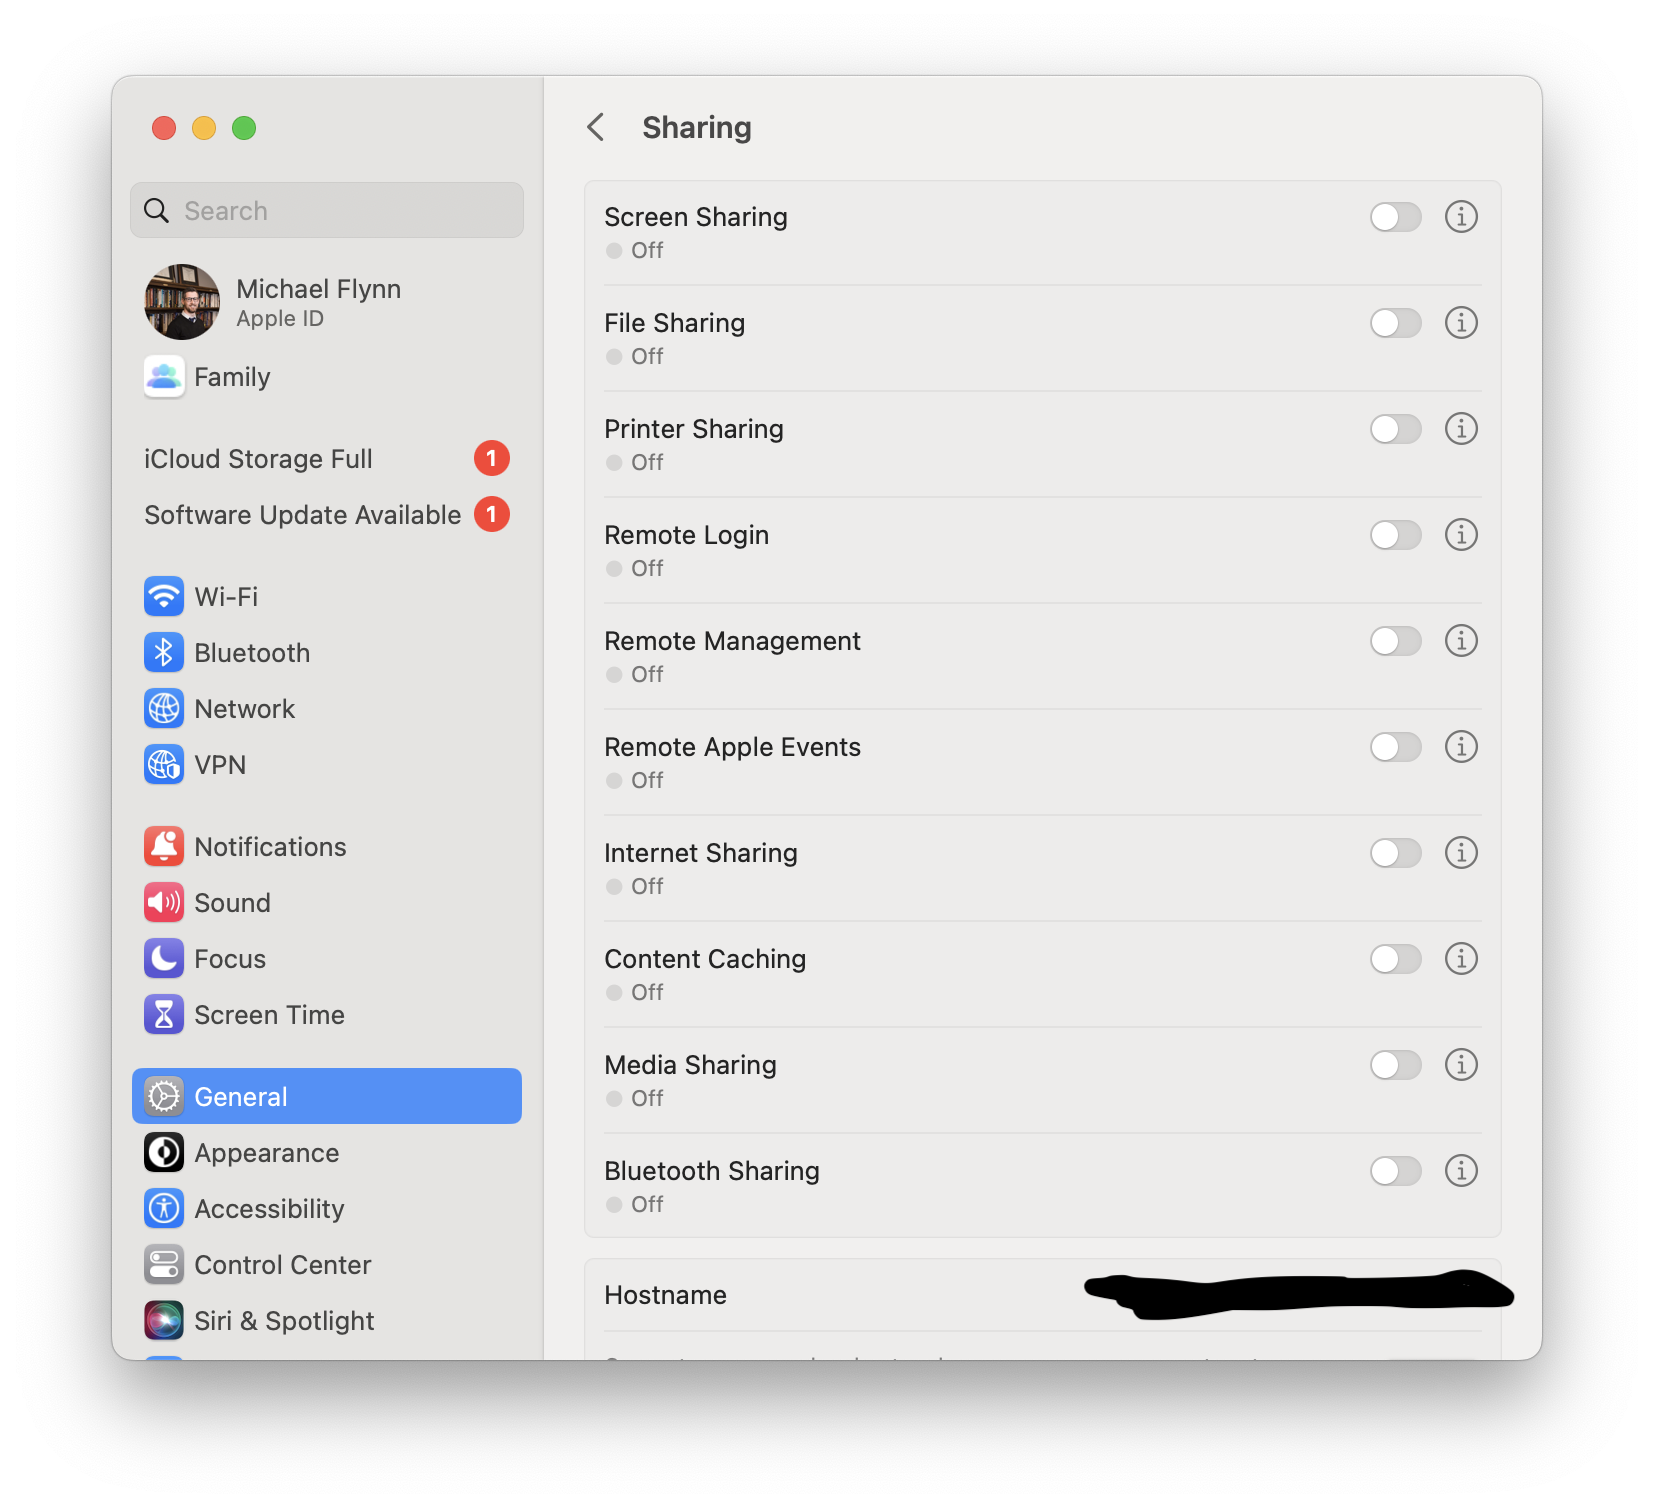
Once you’ve navigated to this menu you then need to alter the security settings and permissions. Figure 2 shows the menu options here that you can change. A couple of these are linked by default, and I can’t remember which exactly, but you basically want to enable File Sharing, Remote Login, and Remote Management. You can also limit which profiles can log in to the computer, and you should definitely make sure that the device is still password protected with a solid password. Also note that you do not have to make these adjustments on your local machine. In my case I’ve only made them on the more powerful machine I want to use remotely.
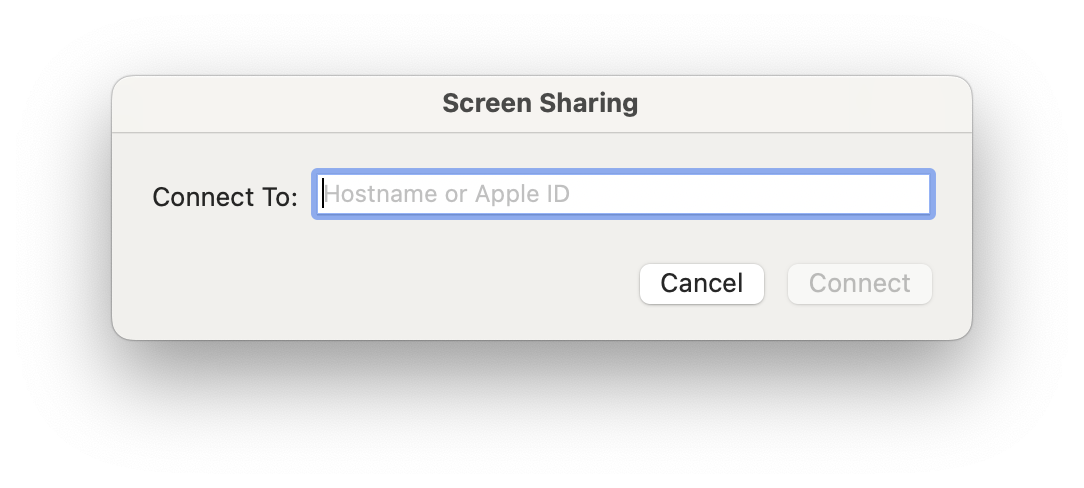
Finally, if you type “Screen Sharing” into the finder on your local Mac (e.g. your weaker laptop) and hit Enter it will open a small window where you can enter your remote device’s IP address from Tailscale. You can see this in Figure 3. After you hit “Connect” it will prompt you to log in to the remote device using your user credentials.
The great thing about this approach is it opens a window that you can use to directly control your remote device from your local screen. This means you can open RStudio and manipulate objects, files, apps, etc., as you normally would. I’m a lazy man, and being able to actually see the content and “use” the more powerful computer directly and without having to makes my life easier.
So far this option has worked great, and provided nobody points out some very obvious and critical security issues (I mean it’s definitely possible), I think this will become a staple of my workflow moving forward. That said, my understanding is that this should be pretty secure through a couple of mechanisms. First, more recent versions of the Mac OS secure connections when you’re using your login information, and keystrokes and mouse movements are all encrypted. Second, Tailscale uses end-to-end encryption and nothing is passed through a cloud-based server of any kind. There are other options that I’ve come across, like using an ssh tunnel, but this is not a procedure I’m familiar with. Ultimately I’d defer to more computer-savvy people for more suggestions on how to use this method in the most secure way possible.
Summary
There are a lot of different ways to speed up your Bayesian models. Packages like {brms} and Stan more broadly provide a number of pathways to achieve speed gains. Some of these are through better coding/programming. Others by taking greater advantage of local computing capabilities. While these options are great, it’s also possible to speed things up by running your models on a more powerful computer. These aren’t really competing options, but it’s good to have a sense of the full range of tools available when running these models.